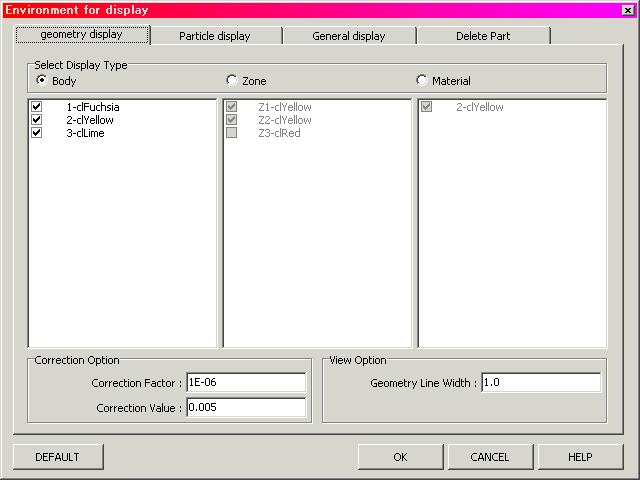
[Environment for display] menu
Select [Environment]-[Environment for Display] in the main menu. Then, a below window shows up.
[DEFAULT]
The environment returns to the initial setting.
[OK]
Input data available. Then, return main window.
[CANCEL]
Input data unavailable. Then, return main window.
[HELP]
This help shows up.
[Tab]
A window control Tab each index. then ,Click Tab replaced input window.
Changing the geometry display
[Select Display Type]
The level of the geometry display can be selected from the following 3 levels:
<Body>
Each body is displayed.
<Zone>
Each zone is displayed. (The zone is a combination of bodies and is called "region" in EGS)
causion)but, if Matrial=0 then not viewing.
<Material>
Each medium is displayed. (Group of the region with identical material.)
causion)but, if Matrial=0 then not list up
also, mouse right click in list. Then, below popupmenu shows up.
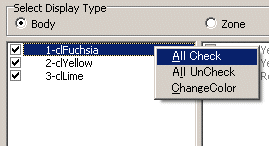
[All Check]
Index in List all checked.
[All UnCheck]
Index in List all unchecked.
[Change Color]
a dialog box for color selection shows up. Please select a color for the item. When the color is selected properly, the color ID code in the list is changed to the selected one.
[View Option]
<Geometry Line Width>
The line width for the standard geometry line is specified. Default=1.(Only Line Display)
[Correction Option]
The zone may not be properly displayed due to a numerical problem of the computer. This tends to happen when the subtraction of a body is done, as shown in the figure below.
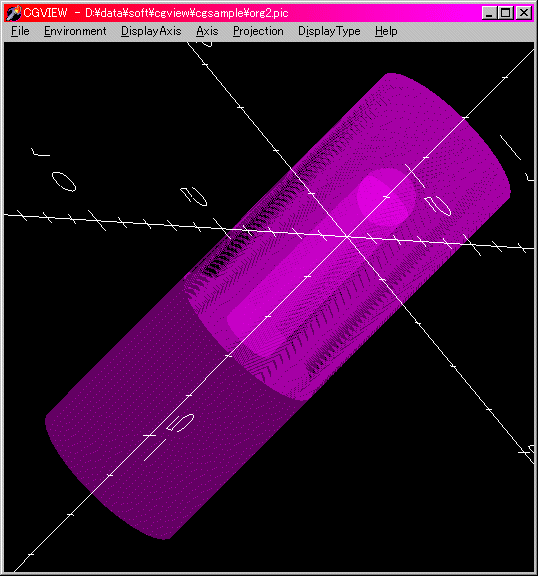
The size of a subtracting body is calculated by the following equation:
Corrected length = Original length * (1 + Correction factor) + Correction Value
<Correction factor>
A correction is specified as the ratio to the original length (default=1E-6)
<Correction value>
Specify a correction value directly (default = 0.005cm)
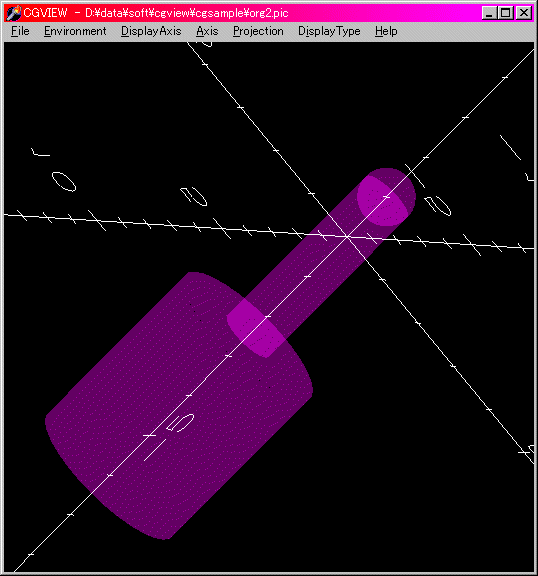
After a correction, the zone is properly shown, as indicated in the figure below.
Changing the specification regarding a particle trajectory display
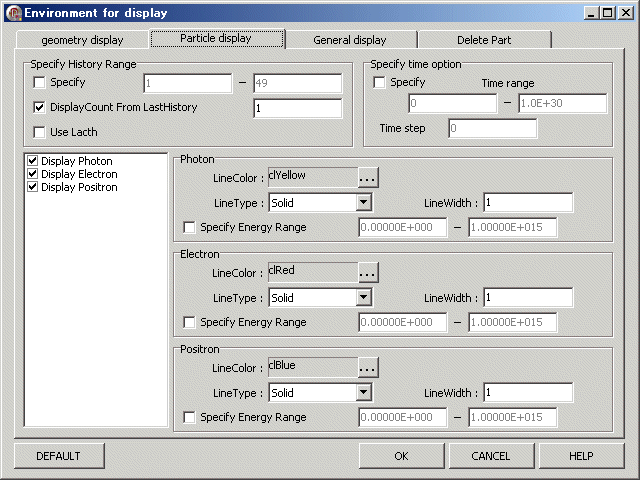
[Specify History Range]
If a user specifies a history region, only the particles within this history region are displayed. The user can select one of the following two possible methods:
[Specify]
[Specify] is indicated in the [Specify History Range] frame. Checks this -> Specify history range. Does not check this -> Not specify history range.
If the history range is not specified, all of the particles are displayed. To specify the range, input the lower limit of the range (Box with 1) and the upper limit of the range (Box with 2) in the textbox at the right-hand side of the [Specify] check box. If either box is left blank, the minimum or maximum history number of the data is assigned as the lower or upper value, respectively.
[Display Count from Last History]
[Display Count from Last History] is indicated in the [Specify History Range] frame
Checks this ü© Specify the number of displaying histories from the last history.
Does not check this ü© Number of displaying histories is not specified.
All of the history is displayed when the history range for the display is not specified. Type in the number of displaying histories in the box(Default = 1).
[Display Particle]
The following 3 kinds of particles are indicated in CGVIEW.
Photon (gamma, x), Electron (e-), Positron (e+)
[Line Color]
The line color for a particle trajectory can be changed. Click button to change the line color. Then, a dialog box to select the color appears. Select a color. The color ID code in the box is changed to the selected one when the color is selected without any trouble. Also, the line color of electrons and positrons can be changed by clicking the button in each box.
[Line Type]
The line type for a particle trajectory can be changed. The following 4 types[Solid line, Dashed line, Single dot chain line, Double dot chain line] of lines can be used.
[Line Width]
The line width for the standard weight particle is specified. Default=1. Because the default line width is 1 pixel, the line of width N is indicated as N pixel line. Input a positive integer to textbox.
[Specift energy Range]
By checking [Specify Energy Range] in a frame of each particle, the energy-range specification is enabled. In this case, a particle is displayed only if its energy is within a specified range. If this button is not checked, the energy range is not specified. Type in the lower and upper energy in text boxes ,respectively , to specify the energy range. If either of these boxes is left blank, 0 and 1e15 are automatically assigned for the lower and upper energy, respectively. Unit is [MeV].
[Specify time option]
By checking [Specify] in [Specify time option] frame, the Animation display is enabled with a file including lifetime data. Time range of the animation is specified by values in "Time range". Time width of one picture is specified by an absolute value of "Time step". If "Time step" is a negative quantity then the starting time is always fixed as starting time which is specified in "Time range". In this case, particle trajectory is displayed as if it is growing as time passes. The unit is same as a file using unit.
The conditions of the display, the background color, title and axis etc, can be changed.
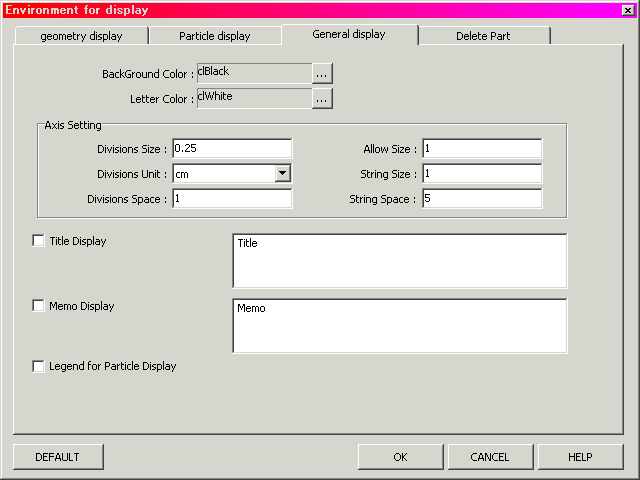
[background color]
It is possible to change the background color. Click [...] button. A dialog box appears to select the color. Please select a color. The color ID code in the box is changed to the selected one when the color is selected without any trouble.
[letter color]
It is possible to change the colors of the axis, title, memo and legend. Click [...] button. Then, a dialog box to select the color appears. Select a color. The color ID code in the box is changed to the selected one when the color is selected without any trouble.
[Axis Setting]
< Divisions Size > Length of the division line at the axis
< Division Unit > Division unit at the axis
< Divisions Space > Interval of divisions at the axis
< Allow Size > Size of allow at the top of the axis
< String Size > Size of character for the division label
< String Space > Spacing for the division label character
[Title Display]
A title can be displayed in a window. Please check [Title Display] in the General display. Then, a sample title appears in an input box, as shown in the following figure. The title can be typed in here. Also, a displayed title can be moved inside the main window by a left click.

[Memo Display]
Memo can be displayed in the window. Check [Memo Display] in the General display. Then, a sample memo appears in an input box, as shown in the following figure. A memo can be typed in here. Also, a displayed memo can be moved inside the main window by a left click.

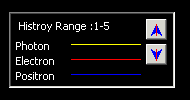
[legend of particle display]
A legend can be displayed in the window. As shown in the following figure, the contents of the legend include the range of history number, the line color and the line type for each kind of particle.
To display a cut view of the geometry, or to show the inside geometry, it is possible to hide a part of the geometry.
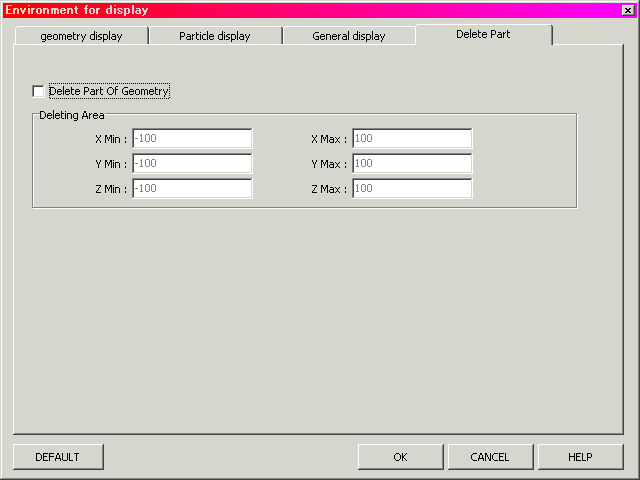
Please check [Delete Part of Geometry]. The range for the deleting part is specified in a frame of [Deleting Area]. Type in the values to specify a virtual box. The geometry inside the virtual box is not displayed. The meanings of the input items are as follows (Unit is in [cm]).
< X Min > Minimum value for X (If left blank, automatically set from data.)
< X Max > Maximum value for X (If left blank, automatically set from data.)
< Y Min > Minimum value for Y (If left blank, automatically set from data.)
< Y Max > Maximum value for Y (If left blank, automatically set from data.)
< Z Min > Minimum value for Z (If left blank, automatically set from data.)
< Z Max > Maximum value for Z (If left blank, automatically set from data.)